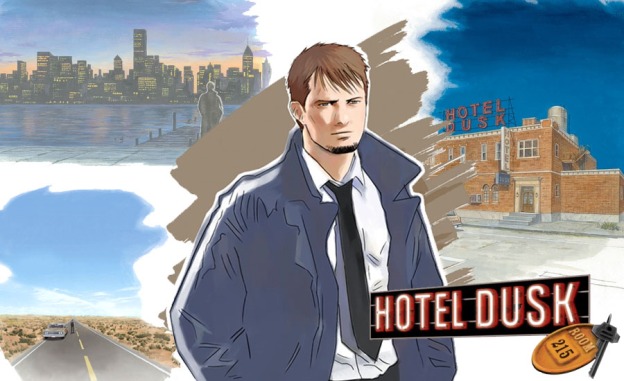
The Kyle Hyde series’ Hotel Dusk. If it wasn’t for this game, maybe I wouldn’t get myself game ripping. A great visual novel that has a unique variety of puzzles. The art style is unique, encompassing the film noir aesthetic that made detective movies so popular. I recommend this game to everyone.
With all that said, I wanted to rip the game. And yet, it was a challenge. The laptop that I used the first time was in no way powerful enough to obtain the sprites with my current method. So I had to go to these Gaming Centers to get the sprites done, and sometimes even borrowing the PC of the school to do the trick. Finally, I got a PC and a small, but decent GPU to simplify my quest. Let’s, at long last, cut to the Chase.
What we need:
– A PC with a GPU that supports OpenGL 3 or higher.
– DeSmuME emulator: Download releases.
– GLIntercept (must match the DeSmuME version, if x86, or x64): Download Releases.
– A Hotel Dusk DS ROM, the European version.
– Hotel Dusk’s European Version Debug Menu Cheat Code (is available down below).
– A photo editor (Photoshop CS6, or Photoshop CC holds best results, and shall be used along in this tutorial, but other editors like Gimp or Paint.Net can be used as well).
Steps:
- Unzip the contents of the .zip files in a single folder.
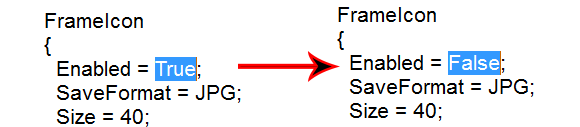
- Open glConfig.ini in a notepad, or any text editor.
- Locate the words „FrameIcon {Enabled True}” and change them to „{Enabled False}”
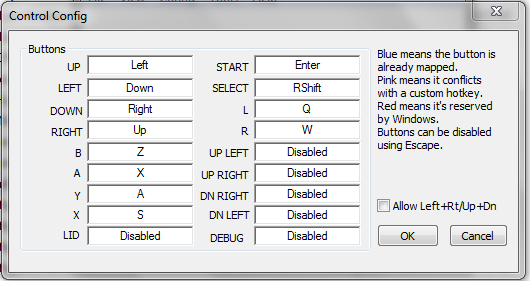
- Open Desmume and ensure that the controls and hotkeys (especially the Pause and Frame Advance buttons) are set up to your liking (due to the fact that this game is played on the original DS like a book, I strongly recommend to set up the D-Pad for it.)
- Load the ROM of Hotel Dusk into the Emulator.
- Copy the following cheat code into the emulator (Must be detected as Action Replay):
0200B470 E3550092
94000130 FFFB0000
0200B470 E3A05004
D2000000 00000000
- Keep the button SELECT pressed while the game is loading in order to access the game’s Debug menu. You can also experiment by holding SELECT in other instances
-GAME MENU: Here, you can choose to Start or Continue the game.
-MAP SELECT: You can select any map from the game. However, if a character doesn’t let you go somewhere because of Chapter conditions in the first save, said restriction will stay in place. In addition, you will spawn in the middle of the map, which can make you stuck in certain maps.
-WALK THROUGH: Same as map select, except there is nobody in the hotel, so, no restrictions. -OPENING: Shows Prologue, then crashes game
-CHAPTER SELECT: You can select any chapter and play through it. Not sure if it will crash after completion.
-SOUND CONFIG: Toggle BGM or SFX on/off (Should had been in the game menu as well imo).
-START MENU: Shows menu at the start of the game.
-DOMINANT HAND SELECT: Switches controls depending on which hand you select.
-ANIME TEST: You can select any character from gameplay and door opening animations, as well as 2D backgrounds from conversations.
-SOUND TEST: You can select any BGM and SFX (Certain SFX may refuse to stop, which may require to switch to a certain SFX or restart the device). -BG TEST: You can select any background, as well as certain events (ex. Melissa throws puzzle) and item close-ups.
-TRICK SELECT: You can select any puzzle from the game, and return to Debug after completion/giving up.
-POCKET BOOK: Enters the in-game menu, aka Notebook.
-CAMERAANIME TEST: Shows the cutscenes where the camera moves around a map.
-DUMMY STAFF ROLL: Roll credits
-TIME TEST: Select any of the clock intermissions that show the time.
-EVENT TEST: You can select any event from a chapter and map, including before/after completing a puzzle.
-DUMMY ENDING: Shows Epilogue cutscene.
-SELECT LANGUAGE: you can switch the game’s language to Fr, Ger, Ita, Spa, Eng. Better than switching to System Menu.
-SYSTEM MESSAGE: Shows system messages.
-THE END: Shows The End screen.
-GAME OVER: Shows Game Over screen.
Because I’m mostly interested in the character sprites, I’ll explain a little about the controls in ANIME TEST, where they are located:
Controls of ANIME TEST:
- A- Selects animation
- B- Goes back to menu
- X- Toggles the dialogue box, which is empty
- L/R- Switches backgrounds to any desired one from the game
- SELECT- Makes said character animation switch go to the left/right screen
- Select the desired character, and the animation from the list
Now, all comes to timing. If you do it right, you will get the sprites, with less to no chance of junk or extra frames.
- Select an animation close to the one you wanted, then pause the game. After that, go to 3D Settings, and switch the renderer from SoftRasterizer to OpenGL3.2. The OpenGL Old renderer works too.

- Ensure you have another window open in the background with the folder of the contents you unpacked earlier. After that, return to the emulator, hold the button for Frame advance, and quickly switch to the desired animation by tapping it or selecting it. When it transitions to the selected animation, pause again, then check the window of the folder to see if there’s an Images folder. If there isn’t, then you may had set up something wrong, or your graphics card isn’t supported.
- Open the Images folder, and search for sprites that have the word 2D in them. the sprites with 1D are junk, and you can dispose of them after you’re done (When you’ll delete, it is easier to delete the entire folder, rather than selecting them. They can reach overwhelming numbers). While having the folder centered on these sprites, you can see that until this moment you have the animation frames, as well as the backgrounds and other elements. If you have encountered any 2D sprites unnecessary, I recommend to trash them now, so you’ll avoid future confusion.
- Put your attention back to the emulator, and press the Frame Advance button at a careful rate (I used to count to 4 each time. If your PC is slow, you may need to count more and viceversa for fast PCs, until you find a sweet spot of waiting time that ensures no clone frames get out), checking from time to time that a new frame has appeared on the Images folder, and no clones have been made.
- At the end of a character’s animation, you will notice that there’s 3 frames that keep looping. You can stop, and check to see if you have doubles in the folder, by comparing the starting frame of the loop with the rest (there is a recognizable pattern).
- After that, you can now preserve the sprite animation in a better place. Don’t forget to select all the sprites, right-click, and choose „Rotate counter-clockwise” for them to face the right orientation.
- Before you close the emulator, be sure to go to Tools>Cheats>Disable, and make sure that there’s a check mark next to it. This is important in order to reopen the game without getting a white screen. After the game has been reset, you may go through these settings again in order to go back to the Debug Menu. (You can also make a savestate of the Debug Menu, which makes this chore useless).
- Observe all the total sprites carefully now. the last 3-4 digits on their number offer a clue as to how they should be assembled. Whether a sprite says “Image_2D_0001_5692” and another one says “Image_2D_0002_5691”, you will come to realize that the first 4 digits are useless and that the last 4 show the actual order of the sprites (you can check it too on the photo viewer to have your suspicions satisfied.)
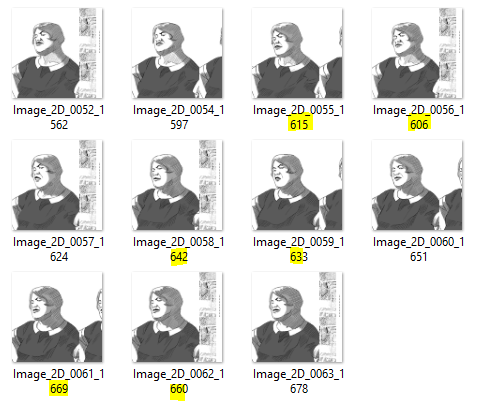 To correct this, just rename them, You could also rename the first 4 digits the same as the one it should be behind it.
 - By now, you have noticed some junk at the edge of each sprite frame. For that, you open all the frames in Photoshop, or any photo editor you want.
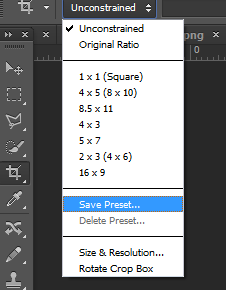
- For Photoshop, select the Crop tool, and select the crop area, excluding the junk, then select the aspect ratio option, and select „Save Preset” (You can give any name you want to this preset so that you won’t forget it). This way, you can reuse the crop area in future sprites that you want cropped, thus saving you lots of time (this is why I recommend PS over others). After that, you can rename the sprites in order to arrange them correctly, make a gif out of them, or place them in any other future projects.
This concludes the tutorial. I hope you understood the procedure of this game. For more questions, you can contact me, and I will answer (at the limits of my knowledge and time).


So helpful post! Thank you.
Do you know last window debug menu action replay code too??
I’m curious about that.
LikeLike
No dice, man. I am thinking of this idea, in which the fandom would crowdfund in order to hire a cheat code maker and give us the code. Like, maybe make a bounty on it or something. It’s one way to have at it, I guess.
LikeLike
Pingback: Journal: The long journey to datamine Cing games after Hotel Dusk | A Game Miner's Journal